
Needle Painting Kits

Price range: $3.31 through $114.33 USDSelect options This product has multiple variants. The options may be chosen on the product page
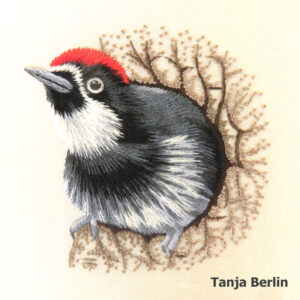
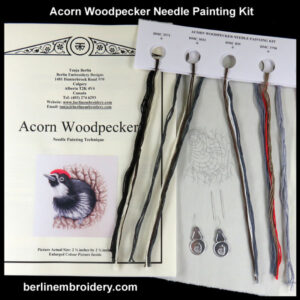
Needle Painting Acorn Woodpecker Kit and PDF File with Colour Work-in-Progress Pictures
The Acorn Woodpecker is a Level 1: Beginners of my Further Education kits in which you have the option of purchasing the 4 PDF files with colour work-in-progress pictures of the entire stitching process on my woodpecker that I provide when I run my on-line classes.
This Kit comes with a free downloadable PDF file with colour work-in-progress photos of the woodpecker but if you are looking to get a fully immersed learning experience to improve your stitching technique I suggest getting the kit and the 4 PDF files option which comes with many more photos and instructions: View Kit Details
Please visit the Needle Painting Information page for more information on needle painting and rating of the designs from easy to hard.
Price range: $3.31 through $114.33 USDSelect options This product has multiple variants. The options may be chosen on the product page
Price range: $1.82 through $52.19 USDSelect options This product has multiple variants. The options may be chosen on the product page
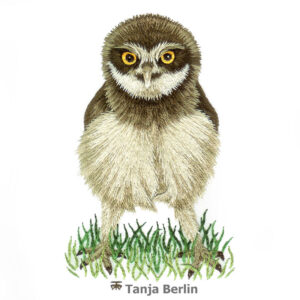
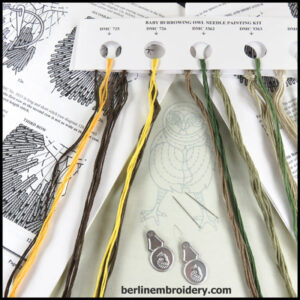
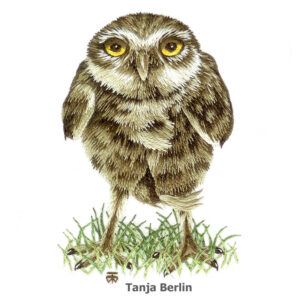
Needle Painting Baby Burrowing Owl Kit and PDF File with Colour Work-in-Progress Pictures
The Baby Burrowing Owl is worked in needle painting also known as thread painting and long and short stitch. This Kit comes with a free downloadable PDF file with colour work-in-progress photos of the owl embroidery.
The Baby Burrowing Owl is for all levels of embroiderers, with the instructions written with the beginner in mind.
Please visit the Needle Painting Information page for more information on needle painting and rating of the designs from easy to hard.
Price range: $1.82 through $52.19 USDSelect options This product has multiple variants. The options may be chosen on the product page
Price range: $1.82 through $56.33 USDSelect options This product has multiple variants. The options may be chosen on the product page
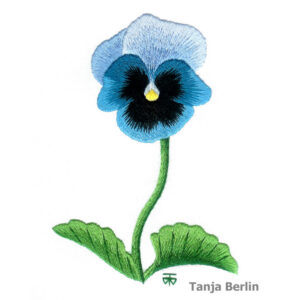
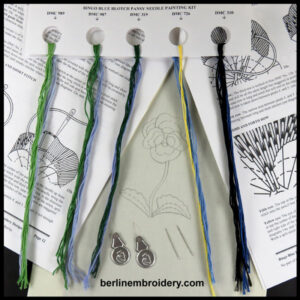
Needle Painting Bingo Blue Blotch Pansy Kit and PDF File with Colour Work-in-Progress Pictures
The Bingo Blue Blotch Pansy is worked in needle painting also known as thread painting and long and short stitch. This Kit comes with a free downloadable PDF file with colour work-in-progress photos of the pansy embroidery.
The pansy is for all levels of embroiderers, with the instructions written with the beginner in mind.
Please visit the Needle Painting Information page for more information on needle painting and rating of the designs from easy to hard.
Price range: $1.82 through $56.33 USDSelect options This product has multiple variants. The options may be chosen on the product page
Price range: $1.82 through $56.33 USDSelect options This product has multiple variants. The options may be chosen on the product page
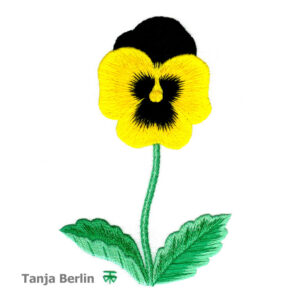
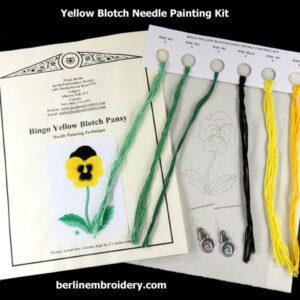
Needle Painting Bingo Yellow Blotch Pansy Kit and PDF File with Colour Work-in-Progress Pictures
The Bingo Yellow Blotch Pansy is worked in needle painting also known as thread painting and long and short stitch.
The pansy is for all levels of embroiderers, with the instructions written with the beginner in mind.
Please visit the Needle Painting Information page for more information on needle painting and rating of the designs from easy to hard.
Price range: $1.82 through $56.33 USDSelect options This product has multiple variants. The options may be chosen on the product page
Price range: $1.82 through $62.13 USDSelect options This product has multiple variants. The options may be chosen on the product page
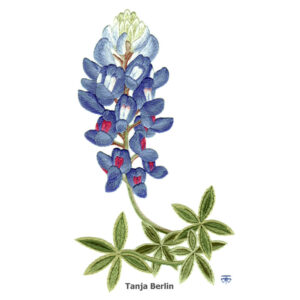
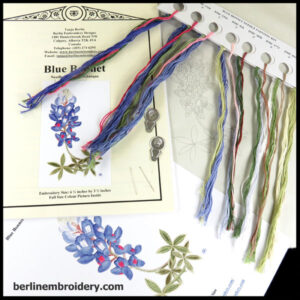
Needle Painting Blue Bonnet Kit
The Blue Bonnet is worked in needle painting also known as thread painting and long and short stitch.
The Blue Bonnet is an advanced design.
Please visit the Needle Painting Information page for more information on needle painting and rating of the designs from easy to hard.
Price range: $1.82 through $62.13 USDSelect options This product has multiple variants. The options may be chosen on the product page

Price range: $1.82 through $49.71 USDSelect options This product has multiple variants. The options may be chosen on the product page
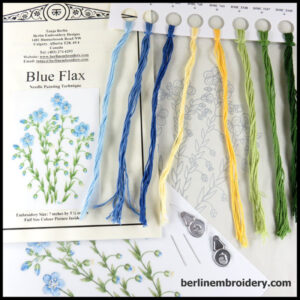
Needle Painting Blue Flax Kit
The Blue Flax is worked in needle painting also known as thread painting and long and short stitch.
The blue flax is for all levels of embroiderers, with the instructions written with the beginner in mind.
Please visit the Needle Painting Information page for more information on needle painting and rating of the designs from easy to hard.
Price range: $1.82 through $49.71 USDSelect options This product has multiple variants. The options may be chosen on the product page
Price range: $1.82 through $48.05 USDSelect options This product has multiple variants. The options may be chosen on the product page
Needle Painting Burrowing Owl Kit
The Burrowing Owl is worked in needle painting also known as thread painting and long and short stitch.
The Burrowing Owl is an intermediate to advanced design.
Please visit the Needle Painting Information page for more information on needle painting and rating of the designs from easy to hard.
Price range: $1.82 through $48.05 USDSelect options This product has multiple variants. The options may be chosen on the product page
Price range: $1.82 through $53.85 USDSelect options This product has multiple variants. The options may be chosen on the product page
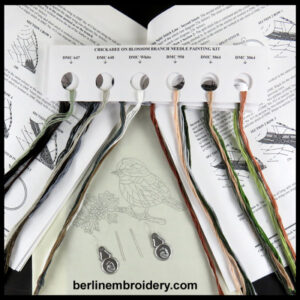
Needle Painting Chickadee on Blossom Branch Kit
The Chickadee on Blossom Branch is worked in needle painting also known as thread painting and long and short stitch.
The Chickadee is an advanced design
Please visit the Needle Painting Information page for more information on needle painting and rating of the designs from easy to hard.
Price range: $1.82 through $53.85 USDSelect options This product has multiple variants. The options may be chosen on the product page
Price range: $1.82 through $78.70 USDSelect options This product has multiple variants. The options may be chosen on the product page
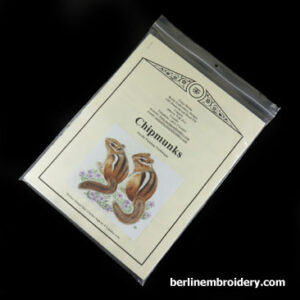
Needle Painting Chipmunks Kit and PDF File with Colour Work-in-Progress Pictures
The Chipmunks are worked in needle painting also known as thread painting and long and short stitch. This Kit comes with a free downloadable PDF file with other 90 colour work-in-progress photos of the embroidery.
The Chipmunks are an advanced design.
Please visit the Needle Painting Information page for more information on needle painting and rating of the designs from easy to hard.
Price range: $1.82 through $78.70 USDSelect options This product has multiple variants. The options may be chosen on the product page
Price range: $1.82 through $56.33 USDSelect options This product has multiple variants. The options may be chosen on the product page
Needle Painting Clear Purple Pansy Kit and PDF File with Colour Work-in-Progress Pictures
The Clear Purple Pansy is worked in needle painting also known as thread painting and long and short stitch. This Kit comes with a free downloadable PDF file with colour work-in-progress photos of the pansy embroidery.
The pansy is for all levels of embroiderers, with the instructions written with the beginner in mind.
Please visit the Needle Painting Information page for more information on needle painting and rating of the designs from easy to hard.
Price range: $1.82 through $56.33 USDSelect options This product has multiple variants. The options may be chosen on the product page
Price range: $1.82 through $53.85 USDSelect options This product has multiple variants. The options may be chosen on the product page
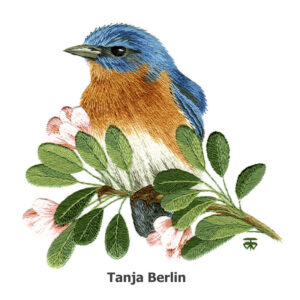
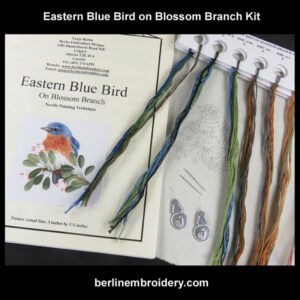
Needle Painting Eastern Blue Bird on Blossom Branch Kit and PDF File with Colour Work-in-Progress Pictures
The Eastern Blue Bird on Blossom Branch is worked in needle painting also known as thread painting and long and short stitch. This Kit comes with a free downloadable PDF file with colour work-in-progress photos of the blue bird embroidery.
The Eastern Blue Bird is an intermediate design.
Please visit the Needle Painting Information page for more information on needle painting and rating of the designs from easy to hard.
Price range: $1.82 through $53.85 USDSelect options This product has multiple variants. The options may be chosen on the product page
Price range: $1.82 through $53.85 USDSelect options This product has multiple variants. The options may be chosen on the product page
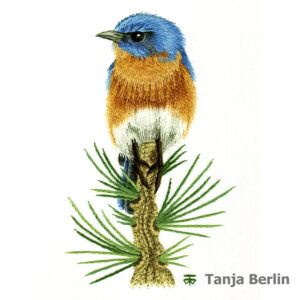
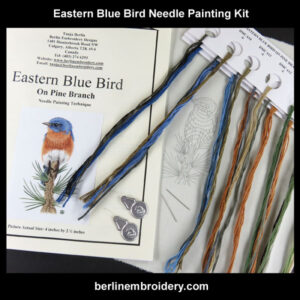
Needle Painting Eastern Blue Bird on Pine Branch Kit and PDF File with Colour Work-in-Progress Pictures
The Eastern Blue Bird on Pine Branch is worked in needle painting also known as thread painting and long and short stitch. This Kit comes with a free downloadable PDF file with colour work-in-progress photos of the blue bird embroidery.
The Eastern Blue Bird is for all levels of embroiderers, with the instructions written with the beginner in mind.
Please visit the Needle Painting Information page for more information on needle painting and rating of the designs from easy to hard.
Price range: $1.82 through $53.85 USDSelect options This product has multiple variants. The options may be chosen on the product page
Price range: $1.82 through $48.05 USDSelect options This product has multiple variants. The options may be chosen on the product page
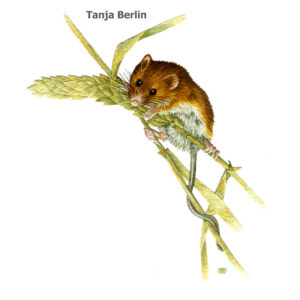
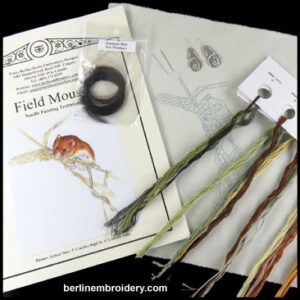
Needle Painting Field Mouse Kit
The Field Mouse is worked in needle painting also known as thread painting and long and short stitch.
The Field Mouse is an advanced design.
Please visit the Needle Painting Information page for more information on needle painting and rating of the designs from easy to hard.
Price range: $1.82 through $48.05 USDSelect options This product has multiple variants. The options may be chosen on the product page
Price range: $1.82 through $52.19 USDSelect options This product has multiple variants. The options may be chosen on the product page
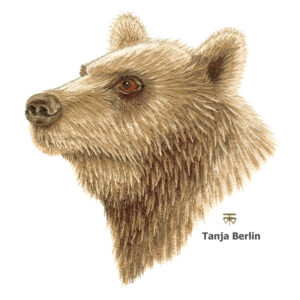
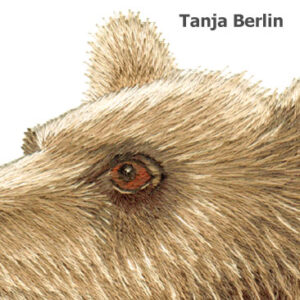
Needle Painting Grizzly Bear Kit and PDF File with Colour Work-in-Progress Pictures
The Grizzly Bear is worked in needle painting also known as thread painting and long and short stitch. This Kit comes with a free downloadable PDF file with colour work-in-progress photos of the bear embroidery.
The Grizzly Bear is an intermediate design.
Please visit the Needle Painting Information page for more information on needle painting and rating of the designs from easy to hard.
Price range: $1.82 through $52.19 USDSelect options This product has multiple variants. The options may be chosen on the product page

Price range: $1.82 through $49.71 USDSelect options This product has multiple variants. The options may be chosen on the product page
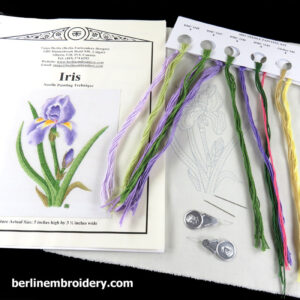
Needle Painting Iris Kit
The Iris is worked in needle painting also known as thread painting and long and short stitch.
The Iris is an intermediate design.
Please visit the Needle Painting Information page for more information on needle painting and rating of the designs from easy to hard.
Needle Painting Iris Kit
The Iris is worked in needle painting also known as thread painting and long and short stitch.
The Iris is an intermediate design.
Please visit the Needle Painting Information page for more information on needle painting and rating of the designs from easy to hard.
Price range: $1.82 through $49.71 USDSelect options This product has multiple variants. The options may be chosen on the product page

Price range: $1.82 through $56.33 USDSelect options This product has multiple variants. The options may be chosen on the product page
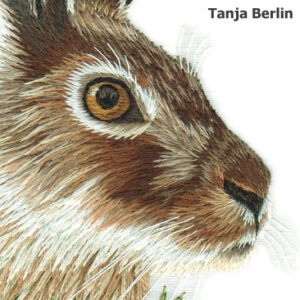
Needle Painting Jack Rabbit Kit and PDF File with Colour Work-in-Progress Pictures
The Jack Rabbit is worked in needle painting also known as thread painting and long and short stitch.
The Jack Rabbit is an advanced design.
Please visit the Needle Painting Information page for more information on needle painting and rating of the designs from easy to hard.
Price range: $1.82 through $56.33 USDSelect options This product has multiple variants. The options may be chosen on the product page
Price range: $1.82 through $111.84 USDSelect options This product has multiple variants. The options may be chosen on the product page
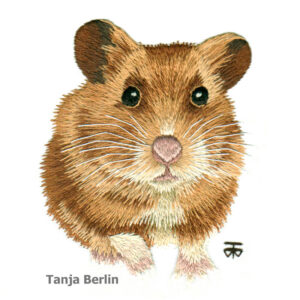
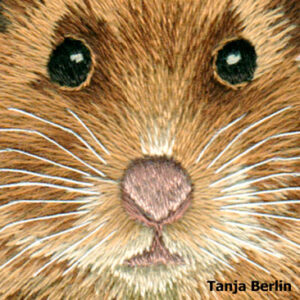
Needle Painting Jimmy The Hamster Kit and 4 PDF Files with Colour Work-in-Progress Pictures
Jimmy the Hamster is a Level 3: Advanced of my Further Education designs.
Jimmy the Hamster is my sisters hamster and I stitched him for my sisters birthday. I took photos of each stage of the embroidery as I stitched him.
Please visit the Needle Painting Information page for more information on needle painting and rating of the designs from easy to hard.
Price range: $1.82 through $111.84 USDSelect options This product has multiple variants. The options may be chosen on the product page
Price range: $1.82 through $45.56 USDSelect options This product has multiple variants. The options may be chosen on the product page
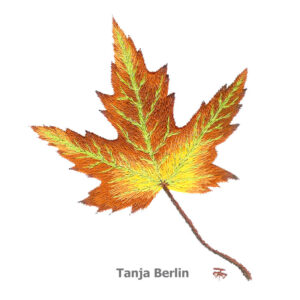
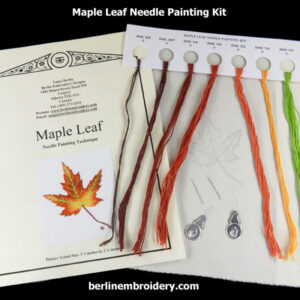
Needle Painting Maple Leaf Kit
The Maple Leaf is worked in needle painting also known as thread painting and long and short stitch.
The maple leaf is for all levels of embroiderers, with the instructions written with the beginner in mind.
Please visit the Needle Painting Information page for more information on needle painting and rating of the designs from easy to hard.
Price range: $1.82 through $45.56 USDSelect options This product has multiple variants. The options may be chosen on the product page
Price range: $3.31 through $78.70 USDSelect options This product has multiple variants. The options may be chosen on the product page
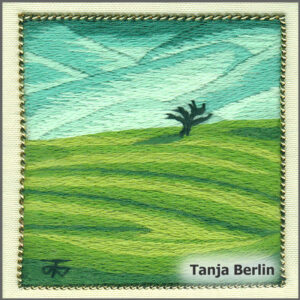
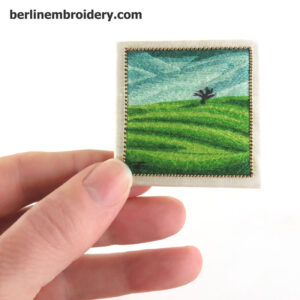
Needle Painting Miniature Landscape Kit and PDF File with Colour Work-in-Progress Pictures
The miniature landscape needle painting is a Level 1: Beginners of my Further Education kits in which you have the option of purchasing the 4 PDF files with colour work-in-progress pictures of the entire stitching process on my landscape that I provide when I run my on-line classes.
This Kit comes with a free downloadable PDF file with colour work-in-progress photos of the landscape but if you are looking to get a fully immersed learning experience to improve your stitching technique I suggest getting the kit and the 4 PDF files option which comes with more pictures and instructions: View Kit Details
The Miniature Landscape embroidery makes a great companion embroidery to the Miniature Treescape embroidery.
Please visit the Needle Painting Information page for more information on needle painting and rating of the designs from easy to hard.
Price range: $3.31 through $78.70 USDSelect options This product has multiple variants. The options may be chosen on the product page
Price range: $3.31 through $48.05 USDSelect options This product has multiple variants. The options may be chosen on the product page
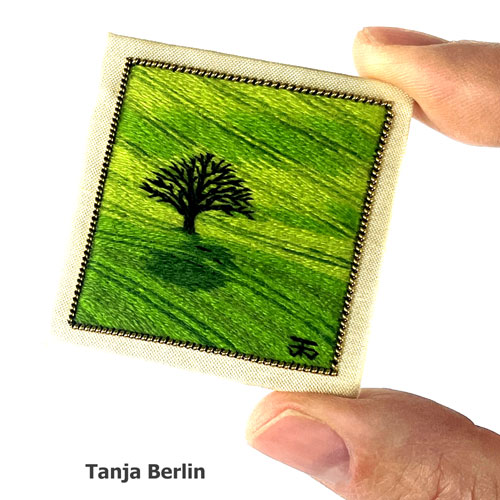
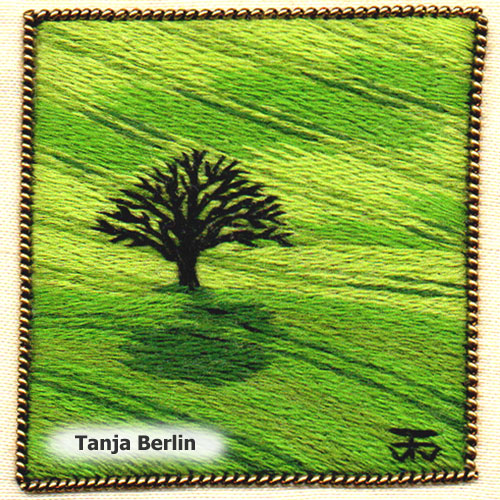
Needle Painting Miniature Treescape Kit or PDF Download
The Miniature Treescape Needle Painting Embroidery is for all levels of stitchers. It is a great learning piece for split stitch and long and short stitch with a single strand of embroidery cotton and is small (1 1/2 inch square). The embroidery takes approximately 15 hours to stitch.
The Miniature Treescape embroidery makes a great companion embroidery to the Miniature Landscape embroidery.
Please visit the Needle Painting Information page for more information on needle painting and rating of the designs from easy to hard.
Price range: $3.31 through $48.05 USDSelect options This product has multiple variants. The options may be chosen on the product page
Price range: $70.42 through $140.84 USDSelect options This product has multiple variants. The options may be chosen on the product page
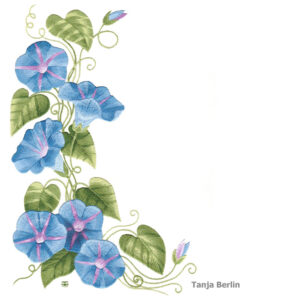
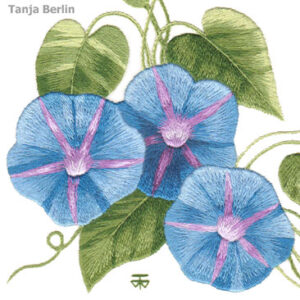
Needle Painting Morning Glories Kit and PDF File with Colour Work-in-Progress Pictures
The Morning Glories is a Level 3: Advanced of my Further Education kits in which you have the option of purchasing the 3 PDF files with colour work-in-progress pictures of the entire stitching process on my morning glories that I provide when I run my on-line classes.
The Morning Glories is worked in needle painting also known as thread painting and long and short stitch.
Please visit the Needle Painting Information page for more information on needle painting and rating of the designs from easy to hard.
Price range: $70.42 through $140.84 USDSelect options This product has multiple variants. The options may be chosen on the product page

Price range: $1.82 through $107.70 USDSelect options This product has multiple variants. The options may be chosen on the product page
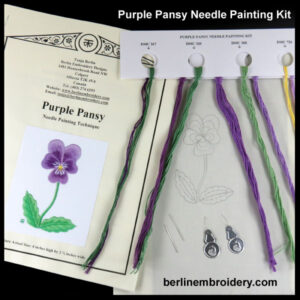
Needle Painting Purple Icicle Pansy Kit and PDF File with Colour Work-in-Progress Pictures
The Purple Icicle Pansy is a Level 1: Beginners of my Further Education kits in which you have the option of purchasing the 3 PDF files with colour work-in-progress pictures of the entire stitching process on my pansy that I provide when I run my on-line classes. The kit alone comes with 1 PDF file with colour work-in-progress photos which is briefer in instructions or select the 3 PDF files for a well rounded learning in the technique. The PDF files are not essential to work the pansy.
The pansy is for all levels of embroiderers, with the instructions written with the beginner in mind.
Please visit the Needle Painting Information page for more information on needle painting and rating of the designs from easy to hard.
Price range: $1.82 through $107.70 USDSelect options This product has multiple variants. The options may be chosen on the product page
Price range: $1.82 through $53.85 USDSelect options This product has multiple variants. The options may be chosen on the product page
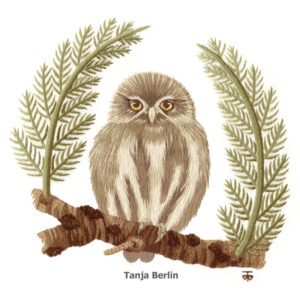
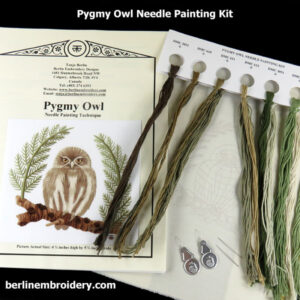
Needle Painting Pygmy Owl Kit and PDF File with Colour Work-in-Progress Pictures
The Pygmy Owl is worked in needle painting also known as thread painting and long and short stitch.
The Pygmy Owl is an intermediate – advanced design.
Please visit the Needle Painting Information page for more information on needle painting and rating of the designs from easy to hard.
Price range: $1.82 through $53.85 USDSelect options This product has multiple variants. The options may be chosen on the product page
Price range: $1.82 through $107.70 USDSelect options This product has multiple variants. The options may be chosen on the product page
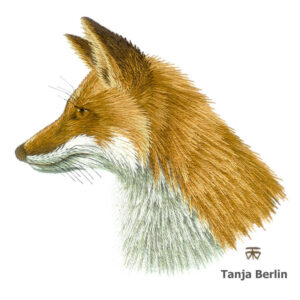
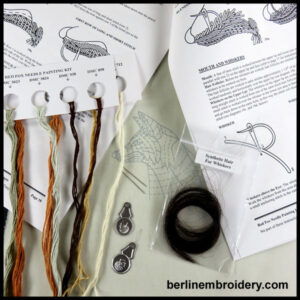
Needle Painting Red Fox Kit and PDF File with Colour Work-in-Progress Pictures
The Red Fox is a Level 2: Intermediate of my Further Education kits in which you have the option of purchasing the 3 PDF files with colour work-in-progress pictures of the entire stitching process on my fox that I provide when I run my on-line classes.
This Kit comes with a free downloadable PDF file with colour work-in-progress photos of the red fox but if you are looking to get a fully immersed learning experience to improve your stitching technique I suggest getting the kit and the 3 PDF files option which comes with instructions: View Kit Details
Please visit the Needle Painting Information page for more information on needle painting and rating of the designs from easy to hard.
Price range: $1.82 through $107.70 USDSelect options This product has multiple variants. The options may be chosen on the product page
Price range: $1.82 through $45.56 USDSelect options This product has multiple variants. The options may be chosen on the product page
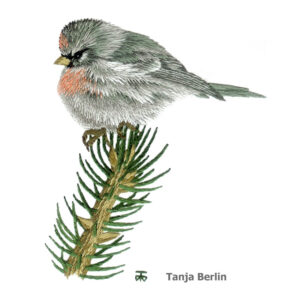
Needle Painting Red Poll Kit
The Red Poll is worked in needle painting also known as thread painting and long and short stitch.
The Red Poll is an intermediate design.
Please visit the Needle Painting Information page for more information on needle painting and rating of the designs from easy to hard.
Price range: $1.82 through $45.56 USDSelect options This product has multiple variants. The options may be chosen on the product page
Price range: $1.82 through $52.19 USDSelect options This product has multiple variants. The options may be chosen on the product page
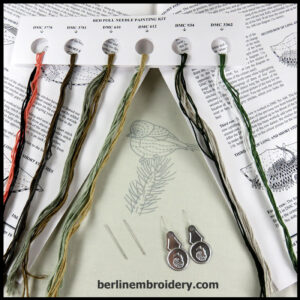
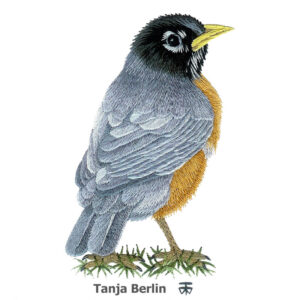
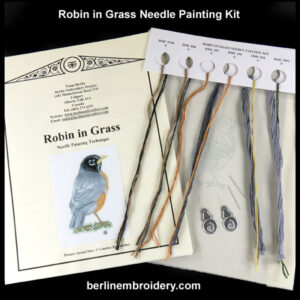
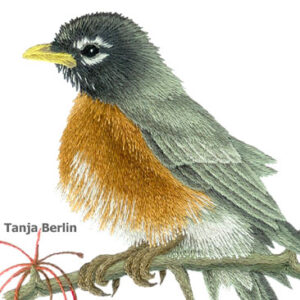
Needle Painting Robin in Grass Kit and PDF File with Colour Work-in-Progress Pictures
The Robin in Grass is worked in needle painting also known as thread painting and long and short stitch. This Kit comes with a free downloadable PDF file with colour work-in-progress photos of the embroidery.
The Robin is an intermediate design.
Please visit the Needle Painting Information page for more information on needle painting and rating of the designs from easy to hard.
Price range: $1.82 through $52.19 USDSelect options This product has multiple variants. The options may be chosen on the product page
Price range: $1.82 through $53.85 USDSelect options This product has multiple variants. The options may be chosen on the product page
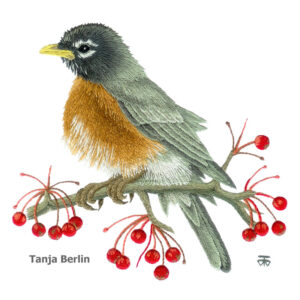
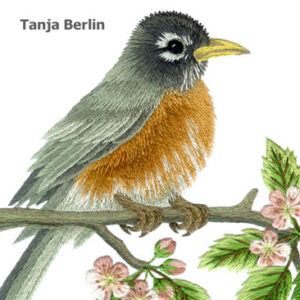
Needle Painting Robin on Berry Branch Kit and PDF File with Colour Work-in-Progress Pictures
The Robin on Berry Branch is worked in needle painting also known as thread painting and long and short stitch. This Kit comes with a free downloadable PDF file with colour work-in-progress photos of the robin embroidery.
The Robin is an intermediate to advanced design.
Please visit the Needle Painting Information page for more information on needle painting and rating of the designs from easy to hard.
Price range: $1.82 through $53.85 USDSelect options This product has multiple variants. The options may be chosen on the product page
Price range: $1.82 through $53.85 USDSelect options This product has multiple variants. The options may be chosen on the product page
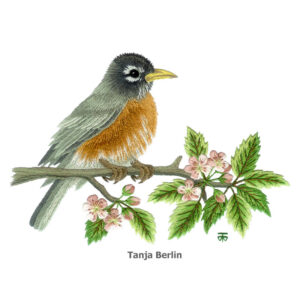
Needle Painting Robin on Blossom Branch Kit and PDF File with Colour Work-in-Progress Pictures
The Robin on Blossom Branch is worked in needle painting also known as thread painting and long and short stitch. This Kit comes with a free downloadable PDF file with colour work-in-progress photos of the robin embroidery.
The Robin is an intermediate to advanced design.
Please visit the Needle Painting Information page for more information on needle painting and rating of the designs from easy to hard.
Price range: $1.82 through $53.85 USDSelect options This product has multiple variants. The options may be chosen on the product page
Price range: $1.82 through $53.85 USDSelect options This product has multiple variants. The options may be chosen on the product page
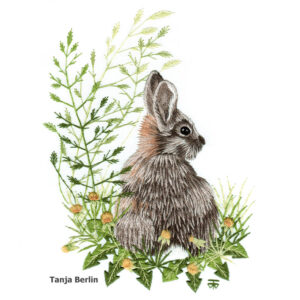
Needle Painting Wild Rabbit Kit and PDF File with Colour Work-in-Progress Pictures
The Wild Rabbit is worked in needle painting also known as thread painting and long and short stitch. This Kit comes with a free downloadable PDF file with colour work-in-progress photos of the wild rabbit embroidery.
The Wild Rabbit is an intermediate to advanced design, please visit the Needle Painting Information page for more information on needle painting and rating of the designs from easy to hard.
Price range: $1.82 through $53.85 USDSelect options This product has multiple variants. The options may be chosen on the product page
Price range: $1.82 through $48.05 USDSelect options This product has multiple variants. The options may be chosen on the product page
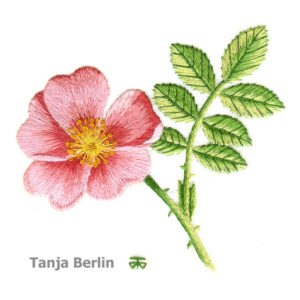
Needle Painting Wild Rose Kit
The Wild Rose is worked in needle painting also known as thread painting and long and short stitch.
The wild rose is for all levels of embroiderers, with the instructions written with the beginner in mind.
Please visit the Needle Painting Information page for more information on needle painting and rating of the designs from easy to hard.
Price range: $1.82 through $48.05 USDSelect options This product has multiple variants. The options may be chosen on the product page
